There’s no gimmick in the title: I’ve written this article on such a laptop. It’s not new, it’s not powerful and it wasn’t as easy as buying a laptop off of Amazon. However, with research and a few hours of hands-on work you can have a sturdy machine perfect for travel, a child’s first computer, or simply a great avenue to familiarizing yourself with computer maintenance and repair.
Step 1: Acquire the laptop
I phrase it ‘Acquire’ because this is the part of the process that will cost the most. You’re not likely to find a bargain on major retailers, but if you’re willing to ask around, dig a little, and accept something with a few scuff marks, you can find a great deal.
If money is your tightest restraint, then it’s best to not limit yourself to a specific model and instead search by year, or a hardware specification such as available memory (formally referred to as Random Access Memory, or RAM.) If you search for laptops with 2-4GB of RAM, then you’re likely to find machines from 2006-2012 as a rough estimate—and of that time frame, you’ll be getting lower-end (read: cheaper) machines.
However, if you don’t mind having to pay a little extra, two product lines are widely viewed by hobbyists as the gold standard: IBM (pre-Lenovo) Thinkpads and Dell Latitudes. Specifically, the Thinkpad X and T series, as well as the Dell Latitude D620/D630 models. These laptops have a solid, durable build quality and have been time-tested to last as long as they’re taken care of. Replacement parts are reasonably abundant, and community support is exceptionally strong. They aren’t very expensive, although demand may mean you pay a few dozen dollars more than a less popular model from that era.
Buy It (Online)
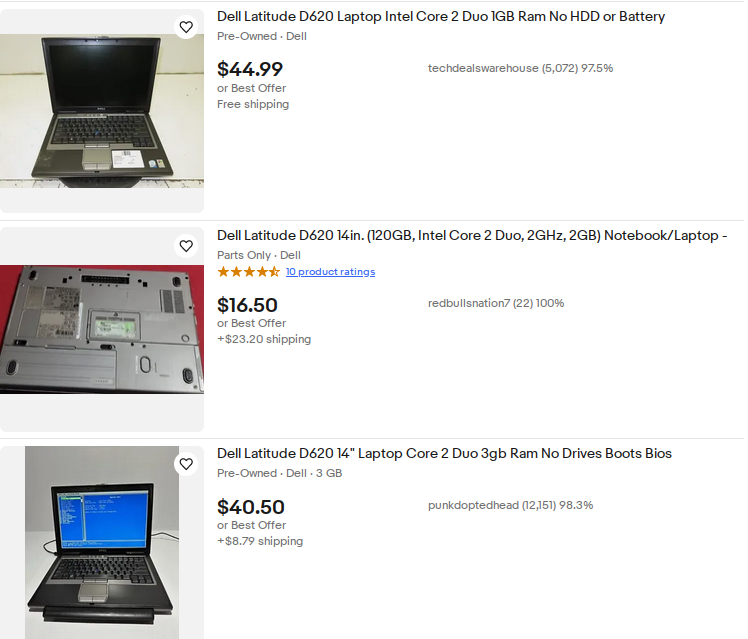
Ebay.com is one of the better websites for buying old equipment. It’s not perfect, but it’s secure and customer-friendly. Many will post old laptops there that either had parts go bad, are just collecting dust, or have just ‘gotten slow’ (which in most cases simply means they’re running a too-modern operating system (OS) or need a newer hard drive.) Look for laptops with visible, but not severe damage. Scuffed panels and cracked corners often translate to cheaper prices with technology, and can easily be fixed with some glue, or tape if you aren’t too picky.
Buy It (Locally)
While online shopping is a sure bet, you might find something better at a garage sale. I’ve found monitors for under $10, and known people who have bought relatively modern machines for under $50. There’s great deals out there, though your selection will likely be more limited than digital offerings. However, it never hurts to try!
Ask Around
Sometimes, you won’t have to pay anything for your laptop. Many businesses will phase out their aging equipment for newer models, and if their machines are exceptionally old they might skip out on reselling entirely. Academic institutions and public libraries are common sources of old business-grade laptops, though oftentimes they have prior arrangements for disposing of their old equipment. Even then, it’s better to ask than assume—every dollar saved on your budget machine is another dollar that can be allocated to better aftermarket parts, or kept in your wallet.
Unlocking the BIOS (Optional)
If you’ve purchased or been given your laptop from an organization, you may not be able to boot past the BIOS because it will be locked. It’s a common security measure that’s also quite commonly forgotten about when disposing of old equipment, which means that until the BIOS is unlocked, it’s effectively a nice looking brick. Be sure to ask the seller if there will be an issue with a locked BIOS; however, if they do not have an unlock code (a very common situation when dealing with long-disused equipment) then you will need to contact the laptop manufacturer’s technical support department.
Step 2: Acquire additional components
These old laptops will rarely be running flawlessly—if at all. The best bargains frequently come with caveats such as the laptop not coming with hard drives, cables or even batteries—that means you’ll have to acquire these components on your own. In the case of hard drives and batteries, this is usually a good thing: you’ll likely want a newer hard drive than was available for these laptops when they were new, and old batteries are rarely able to hold much of a charge. You can expect to pay anywhere from $15 to $30 for a battery, $5-$15 for a charging cable, and hard drive prices depend on what you’re buying.
Hard Drives
I personally recommend a 128GB SATA solid-state drive (SSD): solid-state hard drives are significantly faster than traditional platter-based hard drives of the era, and while 128GB is small by modern standards, it’s more than enough for light daily usage. A hard drive meeting these specifications will run $15-$20, so it’s not a huge investment. Larger sizes are more expensive, but you may benefit from the capacity increase. Stick to your budget and use your judgment!
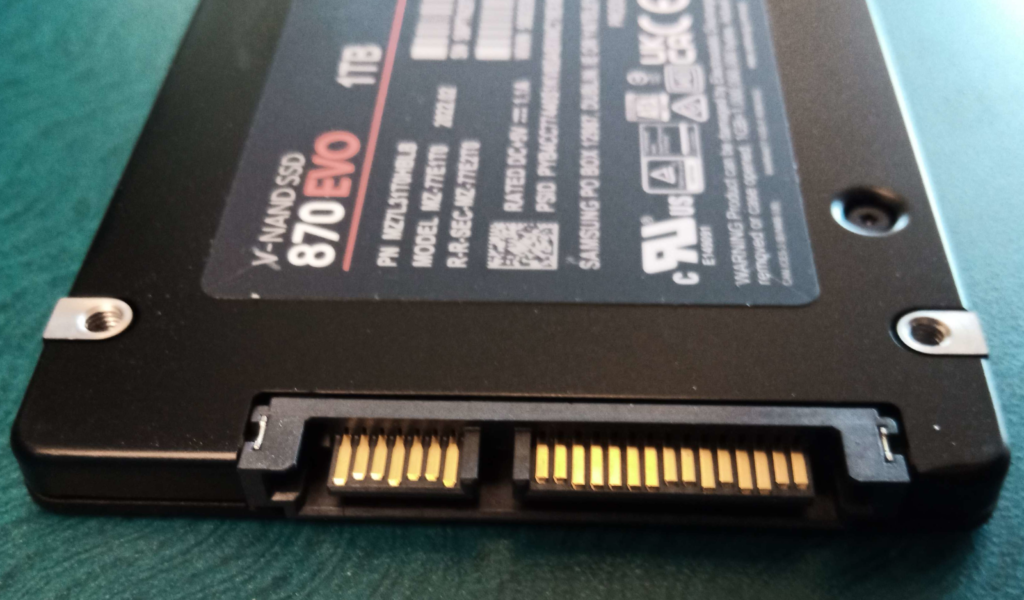
Terminology Note: SATA stands for Serial Advanced Technology Attachment. This refers to the interface plug (pictured below) that allows the hard drive to connect with the motherboard, and is the dominant standard for any computer or hard drive made around 2000-2020 (After 2020, NonVolatile Memory express (NVMe) hard drives have become a popular standard but are incompatible with SATA ports.
RAM
One of the quickest and most reliable ways to speed up and old machine, RAM is cheap and easy to install. However, you must be sure to follow two rules:
- Never mix and match RAM
- If your laptop has more than one slot for RAM, ensure all RAM sticks are the same frequency, capacity (and if you want to be really safe, manufacturer.) Mismatched RAM will make your system prone to instability, crashes, and data loss/corruption.
- Stick to the specs
- All motherboards have an acceptable range of RAM capacity and frequency. For example, if your motherboard is capable of handling RAM sticks of 2GB-8GB capacity and 667MHZ-1000MHz per slot, any RAM stick falling outside of this range will at best, be unstable and at worst not work at all.
CPU
Oftentimes older laptops are limited by their motherboard’s range of acceptable components, so upgrading the CPU may not be as huge a performance increase as you might think. However, if your budget allows it can’t hurt—and there are certain cases where a CPU upgrade is worth it for reasons beyond more speed, particularly with laptops made before 64-bit processing became the dominant standard.
One such example is the Dell Latitude D620. It was not released with a 64-bit CPU. This means that most modern software will not be compatible with the laptop, as 32-bit versions of programs have been phased out over the years. A model of CPU that is both 64-bit and compatible with the D620’s motherboard does exist however, and will at the very least allow the D620 to not be limited to aging or outdated 32-bit applications.
Most laptops made after 2010 will be fully 64-bit capable or at least be relatively easy to upgrade to that status. If this is the case, upgrading your budget laptop’s CPU becomes a lower priority issue. One easy way to tell is to determine the model of motherboard you have in your laptop and use these queries to start: “<motherboard_model> 64-bit chipset” and “<motherboard_model> 64-bit CPUs”.
Motherboard
The motherboard is the foundation of all other components; in theory, if you were to replace the motherboard of an IBM Thinkpad X51 with a motherboard made this year, that 2006-era laptop could be more powerful than a cutting-edge desktop made in 2020.
Unfortunately, form factor is the death knell for upgrading motherboards, particularly in old laptops. Many have their chassis’ internal space built around the motherboard, with barely more than a few millimeters of extra room. The ports on the sides of a laptop are built around the motherboard’s shape, meaning the laptop’s chassis is uniquely suited to that and only that make and model of motherboard. As always, exceptions exist, but they’re not common. To replace the motherboard of most older laptops is to sign up for effectively rebuilding a laptop chassis—which, while not impossible and an arguably fun project—is an undertaking far and above this article’s scope.
Other Components
There may be other parts you’d need to purchase, such as network cards, replacement keyboards or even monitors. This article won’t cover every possibility, but this is another benefit of sticking to the aforementioned ‘gold standard’ models: you’re likely able to find a tutorial to replace any component of the laptop, as well as have reasonable odds of finding replacement parts in good condition for a fair price. Do your research and prepare for some digging—you may need to go through a lot of dead ends before finding an answer.
Step 3: Disassemble, Reassemble
If you have chosen to replace internal parts, you’re almost certainly going to have to disassemble the entire laptop. This can be daunting, even for people who have built their own desktop computer—but it’s an opportunity to learn, and what better equipment to risk a mistake on than an inexpensive laptop? Plus, you likely won’t have to go by pure trial and error: hobbyists love to create tutorials for their favorite gadgets, and old laptops are no exception. Here are two guides on how to totally disassemble a Dell Latitude D620, which can serve as an example of teardown/upgrade guides you can expect to find for your chosen laptop model.
A few tips before you start stripping your laptop down to the chassis:
- Ensure your replacement parts are compatible! You don’t want to complete your upgrade only to find out that your replacement RAM is the wrong frequency, or that your CPU isn’t compatible with the motherboard. Check all specifications and cross-reference them with the capabilities of your motherboard. Then double-check!
- Wear an anti-static wrist strap, or touch a piece of grounded metal every time your hands lift from the laptop. This is to ensure you don’t accidentally discharge static electricity into delicate components.
- Have a small container out of the way to deposit your screws. Ideally, have several: one for each type and size of screw. Lose these at your peril—replacement screws are some of the most annoying components to purchase.
- Invest in a quality precision screwdriver kit with a plethora of bits. It’s better to never have to use a bit, than to have its absence be the only hurdle between you and a completed laptop upgrade.
- Take it slow! Expect to spend one to three or more hours on a teardown/rebuild of your laptop if you’ve never done it before. Even if you’re a veteran of the process, reckless haste never does anyone any favors on the road or on the worktable. You’re dealing with old, delicate components and many a build has been delayed by a slip of the hand sending a screwdriver through a network card.
Step 4: Powering Up
Once you’ve got your laptop hardware as you want it, it’s time to put an OS on that hard drive. The goal is speed and efficiency while minimizing resource usage, so Linux is our answer.
Why Linux?
Linux distributions (commonly shortened to ‘distros’) tailored towards older machines or lighter system resource usage can reach lows that Windows or MacOS versions simply cannot hit. Below is a table comparing the minimum requirements of the lightest still-supported versions of Windows and MacOS, and two Linux distros tailored for older/lighter machines. Click the hyperlinks to see the sources for these statistics:
| Operating System | Minimum CPU | Minimum RAM | Minimum Storage |
| Windows 10 | 1.00GHz | 1GB (32bit) | 2GB (64bit) | 32GB |
| MacOS 12 (Monterey) | 1.40GHz | 4GB | 22GB |
| Xubuntu | 1.00GHz | 512MB | 7.5GB |
| Q4OS | 350MHz | 256MB | 3GB |
As you can see, both Linux distros win out for system resource usage (particularly RAM, which is an invaluable resource in older machines limited by their motherboard.) Not all distros are equal or even intended to be; Q4OS is designed to work on very old machines as well as modern ones, and as such offers very lightweight versions of the OS that Xubuntu does not. If you aren’t sure which distro you should use, I personally recommend Q4OS. I currently use it for my budget laptop without issue, and appreciate the efforts by the development team to provide comprehensive documentation as well as create an interface and software installation interface that feels familiar to fans of Windows XP. If you’d like to browse around, then I recommend these websites as a starting point:
- DistroWatch – Long-standing website dedicated to reviewing and cataloging Linux distributions. Excellent search parameters.
- /r/linux4noobs – Subreddit dedicated to new users of Linux. Great resource for beginner users, or those curious about the Linux ecosystem.
Installing the OS
Once you decide on an operating system, you can download it on the distro’s webpage. The downloaded file should be an .ISO (a type of file that’s essentially a digital version of a disc) that’s anywhere from 500MB to several GB in size. Once you have it downloaded, the next step is to create what’s called a ‘bootable USB.’ This is a USB drive (ideally one you have no sensitive data on) with at least a 4GB capacity formatted a certain way. I’ll spare you the specifics, since they’re not relevant to the process. Ensure that your chosen USB drive is empty of any files you care about (it will be wiped in the process) and that you’ve downloaded the .ISO of the Linux OS you wish to install, then choose your preferred program to make the bootable USB. The two major programs for this purpose are Ventoy and Etcher Balena, each with their pros and cons.
- Ventoy – Powerful tool that is able to format a USB drive so that you merely need to copy the .ISO (or multiple .ISOs) to the drive in order for it to function. Once formatted, you can use the USB drive for traditional storage as well as a bootable USB. More complicated than Etcher Balena.
- Etcher Balena – Straightforward, very beginner-friendly tool that formats a USB drive to be a bootable USB. Only one .ISO can be placed on a USB drive with this tool and the drive cannot be used for traditional storage while formatted as a bootable USB by Etcher Balena.
There’s no right answer, but if you aren’t sure or haven’t done this before, I recommend starting with Etcher Balena. You can always reformat your USB drive with Ventoy (or even format it for traditional storage once you’ve installed your OS.) Etcher Balena’s method is also slightly more compatible in general, as some very old (pre-2009) laptops will not work properly with a Ventoy-formatted bootable USB.
Finally, once your bootable USB is ready, simply plug it into a USB port on the laptop and power the machine on. You’ll want to press the function key that will force the laptop into a boot menu, and that’s usually the F10-F12 keys. To be safe, press all three of those keys very rapidly a second or two after powering the laptop on. You may need to try several times, but you should either enter the boot menu, or see on the screen which key you actually need to press to enter it. When in doubt, search online for answers! “<Laptop make/model> boot menu function key” is a great query to start with.
Step 5: Software
Once you’ve completed the installation of your chosen OS, you should have a functional laptop ready to be used. However, you still need software. Most every Linux distro comes with basic programs, such as a calculator, text editor, file manager and web browser—but lightweight versions typically have little beyond this by default. Linux has a plethora of software for every use-case you can imagine, and it’s become increasingly common for major software companies like Google, Mozilla, Dropbox and more to provide Linux versions of their products. Below I’ll provide a list of my favored programs for a variety of purposes if you’re just interested in getting started as quickly as possible. However, if you want to learn more about Linux software and the family of operating systems in general, LinuxJourney is a website I’d recommend for a full yet approachable, at-your-own-pace introduction.
- Aisleriot – Solitaire game collection.
- Audacity – Audio editing software. Has both Windows and Linux versions.
- Blueman – Bluetooth adapter manager.
- Clementine – Music player and organizer featuring podcast and live feed integration. Has both Windows and Linux versions.
- GParted – Disk/Partition management software. Can be used to format hard drives and USB sticks as well as manipulate drive partitions.
- GIMP – Open-source fully-featured Photoshop alternative. Has both Windows and Linux versions.
- Kate – Text editor akin to Notepad, but more feature-rich.
- Ksnip – Screen capture tool with similar functionality to Windows’ Snip Tool.
- LibreOffice – Office productivity suite comparable to Microsoft Office. Has both Windows and Linux versions.
- Thunar – File manager/browser with high customization and default settings reminiscent of Windows’ file browser.
- Thunderbird – Desktop-based mail client. Has both Windows and Linux versions.
- WINE – Software that enables most Windows programs to run on Linux. It’s not difficult to use, but it’s recommended you read the documentation associated with it before installing
Installing software in Linux
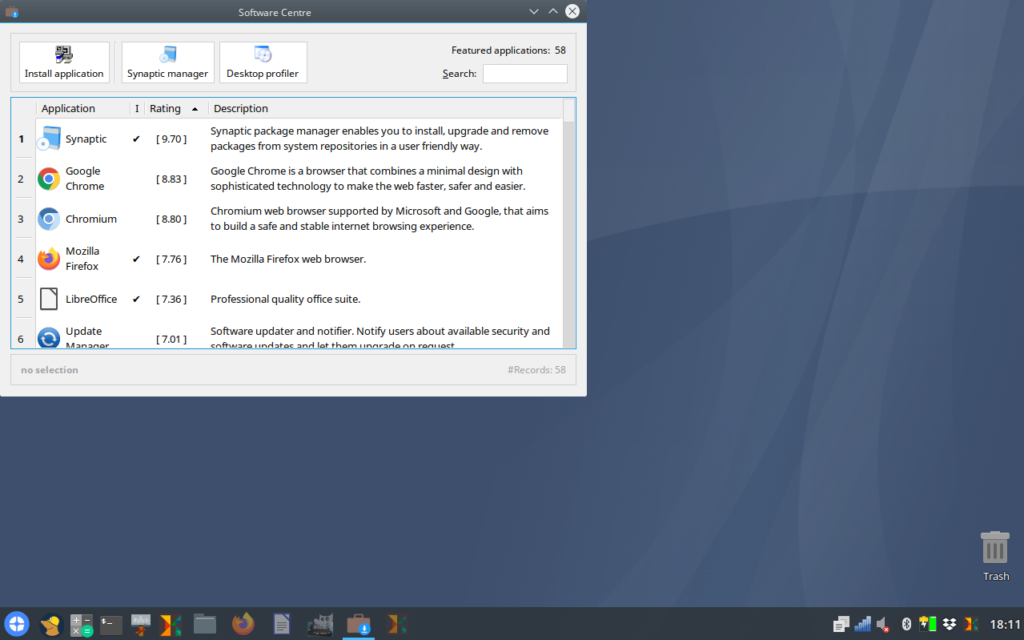
By default, it’s not similar to Windows. Instead of downloading an .exe and either installing or running it, you may be using the command line and inputting commands like ‘sudo apt-get install thunderbird’. Or, you might download a file called an .AppImage, or a .deb. You might be downloading the raw source code and compiling it with provided instructions. Or, you might use a software center akin to the Microsoft Store; it all depends on your chosen distro. This is another reason why I recommend Q4OS for newcomers to Linux who have very underpowered machines; their Q4OS Software Centre and Windows-mimicing installation wizard will feel very familiar to anyone accustomed to the way Windows works. Though I still encourage you to learn the different ways Linux software is installed so you aren’t reliant on any one tool or method!
Complete
If you’ve followed this article from start to finish, you should be able to read this on your ‘new’ laptop! With a subject so nebulous as ‘find old laptop and put some form of OS on it,’ it’s impossible to cover every scenario that may pop up along the way—but I find that to be part of the fun. Working with older technology is never entirely predictable, and often requires creative thinking for unexpected problems. Plus, you end up giving a new life to old equipment that might otherwise be thrown away. If you have any questions or comments, please leave them here or send me an email at site@brooksworks.org.
Leave a Reply